среда, 16 сентября 2020 г.

Best Photo Retouching Software The Complete List (Updated) In 2020 [Best Of Photo Retouching]

Best Photo Retouching Software: The Entire List in 2020

The best idea photo retouching software in 2020?

Retouching a photograph is important to boost the feel of a picture. Regardless if you are a professional photographer or photo editor software kit, you have to select the right apps to retouch a photograph.

Like a professional photographer, you know how it's difficult to take perfect photos. To create your photos perfect, you have to edit individuals images.

And also to edit a photograph, you have to select the right photo editing software.

Because the web is filled with a large number of editing software, it is not easy to find the right one.

Besides, which image editing application is ideal depends upon your editing experience. For instance, if you're a beginner and don’t understand how to edit photos, then it's tough to work with Illustrator to retouch a photograph.

However, if photo editing is the hobby, then while using compensated application might not be for you personally. Within this situation, you need to search for online for free photo editor software kit apps.

Out of this article, it is simple to pick the right photo retouching software that ideal for you. We've listed several photo editing software for novices and professionals.

Also, we've listed some free and cost-effective image editing apps. Consequently, high-cost won't be an obstacle to retouch a photograph.

So, let start and dive into this short article to determine the very best apps for retouching a photograph.

16 Best Photo Retouching Software in 2020

This is actually the complete listing of best image retouching apps:

  • Adobe Illustrator
  • Adobe Lightroom
  • PaintShop Pro
  • Luminar 4
  • Capture One Pro 12
  • Fotor
  • Befunky
  • Gimp
  • Pixlr
  • Darktable
  • On1 Photo Raw
  • DxO PhotoLab 3
  • Portrait Pro
  • Affinity Photo
  • Raw Therapee
  • digiKam

01. Adobe Illustrator

Adobe Illustrator is the greatest photo editing software for photographers and image retouchers.

It isn't just the best for photographers, but the best application for designers, artists, illustrators, and editors.

This giant image editing software has featured with many different advanced tools to retouch a photograph. From fundamental photo editing to advanced e-commerce image retouching, that you can do everything by using this application.

It's advanced layer and masking tools, high-finish touch-up tools, and advanced popping tools. It is simple to remove imperfections in the portrait skin while using clone oral appliance the blemish remover tool.

Also, you may make the portrait skin soft to provide a tempting turn to your subject.

In simple words, to create the best and eye-catching appearance of your portrait, Illustrator has all of the tools you'll need.

Features

  • Advanced photo retouching tools
  • Pro-level brush tools
  • Advanced pen tool
  • Packed with fundamental adjustment tool
  • Advanced layer and masking tools
  • Non-destructive photo editing mode

Regrettably, Adobe Illustrator isn't ideal for the newbie. Because it has intimidated with many different tools, the newbie can’t utilize it easily. Simultaneously, the consumer interface of the application is difficult-to-understand.

Furthermore, it's a pricy software. You have to pay Illustrator for implementing it. Many beginners don’t cash money for doing things within this cost range.

However, I really like Illustrator because of its advanced retouching tools. And also the cost doesn’t matter in my experience because it gives greater than the cost.

If you're a beginner and don’t have sufficient cent but possess a strong wish to use Illustrator, then you should check out this short article. This short article will show you ways to get Illustrator free following a legal way.

02. Adobe Lightroom

Adobe Lightroom is yet another best portrait editing software for photographers.

If you're a beginner and located Illustrator complex, then Adobe Lightroom is ideal for you.

Like Illustrator, Adobe Lightroom has featured with advanced retouching tools.

The main difference between Illustrator and Lightroom is Illustrator is confusing for that beginner. However, Lightroom is clear to see for that beginner.

The interface of Lightroom is user-friendly. Consequently, everybody can certainly retouch a photograph by using this application.

The Lightroom interface has different modules for editing photos. The amount of key modules of Lightroom is 2. First, the Library module along with other is Develop.

The library module ways to use importing and organizing photos. By using this panel, you may make fundamental adjustments.

However, the develop module may be the heart of Lightroom. Within this module, you are able to perform all of the advanced editing tasks to boost a photograph.

Lightroom provides extensive sliders to retouch a photograph.

Features

  • User-friendly interface
  • Lots of presets to boost a photograph having a single click
  • Figures of filters and presets
  • Allow you to organize your photos
  • Lens correction tool
  • Advanced retouching tool
  • Slider based photo editing tool
  • Offer non-destructive photo editing workflow

Regrettably, Like Illustrator, Lightroom is another compensated photo editing software.

03. PaintShop Pro

PaintShop Pro is yet another best skin retouching software. We have an easy-to-use interface but featured with robust retouching tools for enhancing a photograph look.

It's two editing modules one the Edit, and the second reason is Manage.

The Edit tab enables you to perform all of the editing workflows including popping & resizing, removing imperfections, and the majority.

In comparison, The Manage tab enables you to organize your photos perfectly.

The good thing of PaintShop Pro I really like most may be the face recognition technology. It instantly fixes the facial imperfections in line with the subject.

Though it's not a totally free tool, the cost of the application is reasonable. So, everybody from beginner to professional may use miracle traffic bot to retouch a photograph.

Features

  • Support greater than 40 kinds of image format including Digital, Raw, Tiff, PNG, PSD, and so forth
  • User-friendly interface
  • Support plugins
  • Advanced Retouch and Restore tools
  • Enable batch processing
  • Pro layer and masking tools
  • Simple to use
  • Affordable cost
  • Advanced photo editing tools

Supported device: Home windows

04. Luminar 4

Luminar 4 is the greatest photo retouching software for beginner photographers. Especially, it's the best retouching application for that portrait professional photographer.

It's loaded with many different filters and automatic tools to retouch a photograph quicker than your imagination.

I really like both AI Skin Enhancer and Portrait Enhancer tool of the software.

The AI Skin Enhancer tool enables you to enhance the portrait skin rapidly. It instantly detects your skin imperfections and removes them.

Simultaneously, the AI Portrait Enhancer tool enables you to boost the portrait photo within a short while. Such as the Ai Skin Enhancer tool, additionally, it fixes the imperfections evidently, skin, and eyes. Then, it improves the portrait eyes, face, and skin.

The niche of these two automated tools is that you could adjust each of them. Also, you are able to retouch lots of portrait photos at the same time using both two editing tools.

Features

  • Ai skin enhancement tool
  • Teeth brightening tool
  • Red-eye removal tool
  • Blemish removal tool
  • Eye enhancement tool
  • Batch editing

Supported platform: Both Pc and a mac

05. Capture One Pro 12

Capture One Pro 12 is the greatest option to Lightroom.

Should you tired of the subscription-based software, then Capture One Pro will be your smartest choice.

It's marvelous software for processing Raw images, editing the photos, layering, cataloging, and making local adjustments.

Unlike Lightroom, Capture One doesn’t offer lots of modules to edit images. It's merely a module to complete everything from fundamental photo editing to advanced retouching.

The consumer-interface of the application now is easier than Lightroom. You are able to rapidly learn it to edit a photograph.

Features

  • Advanced adjustment tools
  • Simple editing interface
  • Pro-level masking and layer tools
  • Advanced color adjustment tool
  • Advanced place healing tool that actually works much better than Lightroom healing tool

Supported device: Pc and a mac

06. Fotor Photo Editor Software Kit

Fotor is yet another online for free-based photo editing software for novices.

It isn't just a photograph editor application but additionally a collage and graphics maker apps.

By using this application, you are able to retouch up photos, make alluring collages, and business card printing.

The consumer interface of the application is straightforward and sweet. The interface has three tabs including Edit, Collage, and Graphics.

The edit panel has featured with many different tools you have to retouch a photograph. By using this panel, that you can do fundamental editing to advanced level retouching workflows.

It features a 1-touch enhancement tool that allows you to retouch a photograph having a single click.

In comparison, the Collage and also the Design panel allow you to make eye-catching collages and fashions.

Take a look article one Fotor Photo Editor Software Kit Review to determine the characteristics it provides.

07. BeFunky

Befunky is yet another best portrait photo editing software. It's a web-based photo editing application. Like Fotor, it's also free of charge.

Befunky is the greatest application for that beginner professional photographer to retouch up photos. It's featured with a lot of retouching tools to create your portrait different things.

You may also crop and re-size the photos, apply effects and filters, and make design and collages using Befunky.

Like Fotor, Befunky has three primary editing panels, one Edit, Collage Maker, and also the 4g iphone is Graphics.

Under Edit, you will find a couple of image editing tools to boost your photos. Out of this panel, you are able to re-size a photograph, remove blemishes, and apply lots of effects.

The collage maker enables you to create lots of designs collage photos. And also the Graphics enables you to make business card printing, invitation cards, and so forth.

08. GIMP

GIMP is the greatest free Illustrator alternative application.

Like Illustrator, it's also featured using the advanced pen tool, brush tool, clone stamp tool, and so forth.

The interface of GIMP is comparable to Illustrator. Though GIMP’s interface is equivalent to Ps, Gimp doesn’t intimidate with many different tools.

With regards to retouching on GIMP, it is best than any Illustrator alternative. Gimp has featured with advanced retouching tool for the greatest appearance of a picture. We have an advanced healing tool to get rid of all of the skin imperfections from your image.

Also, it provides extensive tools to help make the portrait skin smooth and soft.

It's a free image editing apps because it is a wide open-source image editing application. Which means you don’t have to spend just one cent for implementing it.

09. Pixlr

Pixlr is another free photo editing application to retouch a photograph.

Like Befunky, it's also lots of filters and effects to create a picture from general to gorgeous.

It's featured with many different retouching tools to get rid of blemishes, spots, acne, and dirt in the portrait skin.

Pixlr can also be ideal for fundamental photo editing including resizing & popping, removing image background, and so forth. You may also add text for your photo using Pixlr.

This online-based image editing application has additionally featured with many different filters. Applying these filters, it is possible to provide the best appearance of your photo.

The interface of the application is super simple. Giving some minutes for doing things, you may be an expert on Pixlr and enhance the photo quality within a short while.

10. Darktable

Darktable is the greatest free option to Lightroom. Like Gimp, it's also a wide open-source photo editing application. Which makes it also free of charge.

Darktble has additionally lots of editing modules including Lighttable, Darkroom, along with other.

The sunshine table works because the Lightroom Library does. By using this panel, you are able to import photos on Darktable. Also, you are able to organize your photos according to location, date, and providing a star mark.

The Darkroom may be the heart of Darktable. It really works like the Lightroom’s Develop module. You are able to correct the lens imperfections, enhance photo color, and take away skin imperfections out of this panel.

Like Lightroom, Darktable has additionally lots of presets to boost a photograph look having a couple of clicks.

However, Darktable is right for processing raw images. Even it performs much better than Lightroom.

11. ON1 Photo Raw

ON1 Photo Raw is exclusively created for photographers. From photo organizing to advanced retouching, that you can do everything by using this photo retouching software.

It offers countless customizable presets to offer the best look you would like.

Besides, On1 Photo Raw curates trending looks and photo editing styles inside your industry. Using the presets in the list, you may create a distinctive photography style that defines yourself.

In a nutshell, it's a multi functional photo editing software for photographers.

Features

  • Raw Image Processing
  • Non-destructive editing
  • AI Auto Tone
  • Effects Filter
  • Custom Camera Profiles
  • Local Adjustments
  • Text Tool
  • Trending Presets
  • HDR editing
  • Layers and Tools
  • Lens Correction
  • Skin retouching
  • Color correction
  • Portrait Tools

Supported Platform: MAC and Home windows

Cost: $99.99

12. DxO PhotoLab 3

DxO PhotoLab 3 is the greatest photo color correction software available. It's specifically created for correcting photo color.

The brand new HSL Tool of the software helps you to manage Hue, Saturation, and Luminance to produce a more colorful and natural-searching photo.

Therefore, DxO ColorWheel is a superb color adjustment tool that can help to create more colorful photos selecting any color range.

Besides color correction, you may also edit and retouch your portrait photo by using this photo editing software.

Features

  • Red-eye correction for facial and eye retouching
  • Customizable interface
  • Batch processing
  • Advanced Repair tool
  • Includes 40 presets to enhance photos having a single click
  • Automatic Repair Tool
  • Local Adjustment Masks tool

Support: Home windows & Mac

Cost: $123

13. Portrait Pro

Portrait Pro is a superb portrait photo editing software.

If you're a portrait professional photographer, this software programs are just for you. By using this portrait retouching application, it is simple to enhance the feel of your portrait photo.

The AI tool of the application allows you to identify facial defects instantly. You are able to remove hair, skin, and so forth efficiently by using this software.

In addition, it features a skin-smoothing tool to get rid of blemishes and shadows in the portrait skin.

Indeed, it's the best portrait retouching software on the internet.

Features

  • AI Skin-smoothing tool
  • Expression tools
  • Lens corrections
  • Customizable retouching presets
  • AI Face recognition tool
  • Eye enhancement tool
  • Smart Filter

Support: Home windows & Mac

Cost: $44.95

14. Affinity Photo

Affinity Photo is yet another best photo editing software for photographers. It's packed with advanced photo editing tools to create your photo perfect and visually impressive.

From fundamental editing to professional retouching, there's nothing you can’t do by using this software.

You are able to edit raw photos, remove defects, batch processing, and so forth with the aid of Affinity Photo.

Features

  • Raw photo processing
  • PSD photo editing
  • Mask & Clipping layers
  • Includes lots of brushes
  • HDR editing
  • Advanced retouching tools


Support: Mac, Home windows, iOS


Cost: $49.99


15. Raw Therapee


Raw Therapee is the greatest option to Darktable. Like Darktable, it's also free photo retouching & raw editing software.


The good thing of the application is that you could process and manage the raw photos more proficiently.


Additionally, it offers non-destructive photo editing workflows. That’s mean you are able to retouch a photograph maintaining your original photo intact.


Features


  • User-friendly interface

  • Completely free of charge

  • Advanced raw image processing

  • Advanced color correcting tools

  • Loaded with many different fundamental photo editing tools


Support: Linux, Mac, and Home windows


Cost: Free


16. digiKam


digiKam can also be free photo retouching software on the list. You are able to edit raw photos, organize images, and so forth.


Furthermore, by using this application, that you can do some fundamental photo editing works.


  • Free of charge

  • User-friendly interface

  • Photo organizer

  • Batch processing

  • Image popping & resizing

  • Brightness and contrast adjustment tool


Support: Linux, Home windows, and Mac


Cost: Free


The best idea photo retouching software?


If you're searching to have an advanced image retouching application that may use for industry use, then Adobe Illustrator is the greatest selection for you.


In comparison, if you discover Illustrator hard to use, then Adobe Lightroom is ideal for you.


If photo editing is the hobby and searching for any free image retouching application, then Gimp may be the best brand out there. You don’t require a single cent for doing things.


However, if you're searching to have an affordable image editing application, then Luminar 4 or Capture One Pro 12 can work best with you.


Have you ever used any software in the list we in the above list? If you are using, then share your knowledge about us. We're eagerly awaiting talking with your side.


FAQ for Photo Retouching Software


What's the easiest photo editing software to make use of?


Lightroom, Darktable, Pixlr, Befunky, and Gimp are the easiest photo editing software to edit photos.


Exactly what do most photographers use to edit Photos?


Adobe Illustrator and Adobe Lightroom are broadly utilized by the majority of the photographers, whether he's a professional or perhaps a beginner.


What's best Illustrator or Lightroom?


Illustrator and Lightroom are generally better for photo editing. However, Illustrator is much more capable than Lightroom.


Is Lightroom the very best photo editor software kit?


Lightroom is the best for photo color correction.


The best idea photo retouching software?


Obviously, Illustrator is right for retouching photos.


вторник, 15 сентября 2020 г.

Lightroom 5 Photo Editing Tips To Improve Your Travel Photographs - Photojeepers [5 Photo Editing

Lightroom: 5 Photo Editing Ideas to Enhance Your Travel Photographs


Discussing is caring!


  • Share

  • Tweet

  • Pin


This isn't your typical Using Lightroom article. Rather I must share my story about why I personally use Lightroom to edit my photos.


Let me share these 5 photo editing tips, or my causes of using Adobe Lightroom, that will help you decide if this sounds like the best software for you personally.


The arrival of digital camera models certainly revolutionized photography. For me personally the actual revolution arrived my discovery of photo editing software for example Lightroom.


Presently I integrate Adobe Lightroom and Illustrator included in my normal photo editing tactic to accomplish my final vision for those my images.


A few of the links on this website are affiliate links, meaning should you book or purchase something through one of these simple links,
we might earn a little commission – free of charge for you! Browse the full Disclosure Policy.

The Adobe Creative Cloud Photography Plan includes Lightroom and Illustrator. This is actually the best photo editing software for me personally.


I shoot in raw and remember to make certain my images are dialed in during the time of capture to ensure that composition, light, and subject are things i picture.


After I enter my twenty-first century dark room, my office, I personally use Adobe Lightroom to start the ultimate step from the image creation process.


My Story


I'm a professional photographer having a varied good reputation for experience and amounts of expertise.


Like a teen, I focused exclusively on trying to permanently capture special recollections or moments that made an impact upon myself.


I'd no training or expertise. I didn't even comprehend basics like the rule of thirds.


Searching back on individuals old pictures I don’t use whatever images which are inspiring or contain any degree of “wow factor”. They're still, however, vital that you me from the sentimental point of view and definitely satisfy the requirements that these were taken.


I bring these old photos into this discussion as their relevance is based on the building blocks they offer to any or all my current endeavors.


I check out my development like a professional photographer being an extensive type of small steps that encompassed decades.


The pictures I shoot today are extremely of the much greater quality because of better equipment and elevated understanding, however i still begin to see the influence of individuals early images. Those are the life blood of my current work, the foundation of my passions.


I photograph what impacts me like a person so that as a painter. That each style forged in the heart is exactly what truly helps make the improvement in the pictures we produce.


5 PHOTO EDITING TIPS USING LIGHTROOM


Organization and Selection


Adobe Lightroom software is really a effective tool for image organization, however the full potential is difficult to understand.


The very first Lightroom photo editing tip is to look for the photo organization way in which works well with YOU.


Here are a few wonderful sources that you should learn about organization in Lightroom:


When it’s time to decide on the images I wish to process, design from the Lightroom work window is extremely favorable to evaluating and selecting images you need to keep or discard. It enables me to simply change from one image to a different when i compare and critique them.


Color and Mood Creation


Color and mood creation is yet another Adobe Lightroom photo editing tip.


Lightroom enables you complete control of image aspects for example contrast, exposure, and highlights. The program offers several choices relating to paint and shade.


I've found Lightroom to become simpler, faster, and much more complete than Illustrator in fundamental photo editing.


Black and white-colored, sepia, or altered temperature images can be simply produced with presets or tool bars.


Lightroom enables you to definitely create or download setting presets so that you can complete the photo editing with a single click!


Brush Corrections


Adobe Lightroom offers many brush options that permit a lot of detailed photo editing.


Brush corrections is my third Lightroom photo editing tip. Everyone has images which contain flaws within specific servings of the photo that detract but don't destroy.


Among this is one which I've worked within photographing bald eagles occasionally. It may be simple to capture the look using the novelty helmet mind too vibrant without any highlights, as seen above.


After I set the palette brush to focus on adjustment, it enables specific correction towards the eagle’s mind to create the detail without having affected all of those other image.


The different palette brushes available within Lightroom allow a lot of artistic expression in creating a mood or message in your photo.


HDR and Panorama Creation


I like while using HDR and Panorma functions in Lightroom, so that they are photo editing tip # 4.


HDR (High Dynamic Range) imaging uses three photos, taken at different exposures, to produce a more complete image.


You utilize editing software like Lightroom to place individuals three pictures together and highlight the very best areas of each photo.


Lightroom is really a tremendous tool for developing a breathtaking image.


When the challenging field work of recording the different images is finished, the program easily merges individuals photos of the landscape right into a breathtaking panorama.


You can observe a fast preview from the panorama making alterations in it prior to the merged image is generated, which makes it easy and easy to use.


Repair and Tools


This last photo editing tip might be more advanced, but essential if you need to do major repair or alteration work.


I personally use Adobe Illustrator to create repairs or alteration.


I complete my fundamental photo editing in Lightroom, slowly move the image to Illustrator for just about any major repair or alteration I wish to do, then save the look to Lightroom.


Within the photo above, I needed to get rid of the individual hiking underneath Double Arch at Arches Park. I circled the walker within the photo.


First, I applied the landscape presets I love to use within Lightroom, then moved the look to Illustrator where I removed the walker.


After taking out the walker, I saved the look to Lightroom and saved the finished photo.


Adobe Lightroom itself has numerous repair features which are fast and useful that don’t require using Illustrator. The program provides exceptional place removal, red eye repair, and popping tools. There's also tools for noise reduction and sharpening that work well and simple to use.


For me personally, the invention of Lightroom was the capping stone within my creative process. I'd used Illustrator for a long time, but incorporating Lightroom into my photography repertoire dramatically improved my organization and processing speed.


The bottom line is to determine which photo editing process and software is the best for your photography style.


TRAVEL & PHOTOGRAPHY TIPS:


Being a good professional photographer doesn’t mean getting the very best camera gear. To enhance, you have to practice.


It’s best to read watching tutorials, however, you won’t really progress before you place the information you've accrued into motion!


If you want to purchase a new travel camera, then get it done.


But additionally make sure to invest time and money into learning new photography skills in case you really wish to capture stunning travel photos!


Travel Cameras:


Would you like DSLR quality images, however, you don’t wish to transport and bear heavy DSLR gear?


We advise these compact travel cameras that provide you pro-quality images with no bulk and weight of the DSLR.


Travel Tripods:


If you would like high-quality images, you'll need a tripod! Should you travel or hike like we all do, you'll need a compact tripod that’s sturdy, but additionally lightweight.


We advise these portable and light-weight tripods. Find the one which most closely fits your travel and photography style and budget.


Watch our Photography Basics Video Series:


Make sure to SUBSCRIBE which means you are notified when new videos are published.


PIN Later On


Should you enjoyed reading this, please share and tell us your ideas below.


Being an Amazon . com Affiliate we make money from qualifying purchases.

1 Comment


Many thank you for discussing this type of superclass recommendations on photo editing. Without doubt! I'm a lot astounded by your tips. keep posting such type of info on your page. I'll certainly find it and personally suggest to my buddies. I’m sure they’ll be taken advantage of this site.


Submit a remark Cancel reply


We're Dave and Jamie, a husband wife team resides in Salt Lake City, Utah. For all of us travel and photography go hands-in-hands. We produced this website to inspire you to definitely Photograph Your Adventures! You Are Able To take WOW photos with any camera. So decide to explore – take pictures & relive recollections!


  • Facebook

  • Instagram

  • Pinterest

  • YouTube


We're a participant within the Amazon . com Services LLC Associates Program, a joint venture partner advertising program designed to supply a method for us to earn charges by linking to Amazon . com.com and affiliated sites.


takE WOW photos with ANY camera!


понедельник, 7 сентября 2020 г.

Online Passport Photo Editor - Best Photo Generator - E [6 Photo Editor Online]

Make Passport Photo Online - U.S. Passport Photo Tool

U.S. Passport is really a travel document that confirms the identity from the holder mainly for worldwide travel purposes. Passports usually contain private data for example: place and birth date, the holder’s name and surname, signature, and photograph. Furthermore, right now all countries are generally issuing or intending to issue biometric passports which may come with an embedded microchip that will make sure they are machine-readable and harder to counterfeit.

In 3 seconds, we'll help your photo on any background to some professional photo for the document!

U.S. Passport photo - Digital photo size & needs

  • Width: 2 in
  • Height: 2 in
  • Mind height: 1.29 in
  • Bottom from the Photo towards the Eye Line: 1.18 in

Needs for any passport photo

Current needs for any passport photo are based on the rules of person exhibitor states. It's important to note the photo format and it is additional features frequently differ, e.g. the photo we use for any US passport will most most likely 't be helpful to all of us whenever we obtain a Vietnamese passport. However, there are several universal guidelines when it comes to passport photos:

US Passport photo needs

  • Neutral facial expression
  • You ought to directly face your camera with full face because
  • Normal clothing. Extravagant outfit or uniforms could potentially cause a photograph rejection. Religious clothing, however, is permitted
  • Background ought to be white-colored or off-white-colored colored.
  • Glasses, earphones along with other products shouldn't be worn
  • The passport photo ought to be taken in the last six several weeks

Generally, ID card photos will also be known as biometric photos. all passport photos are extremely-known as biometric photos, i.e. individuals that let us download our individual features that provide fast and reliable identification. Therefore, usually in photography you should be positioned frontally and appear straight ahead. Visibility of your partner is definitely excluded, and also the background needs vary, but generally it ought to be uniform, one-color (usually light, it happens that e.g. the backdrop should be blue or fast). Records regarding glasses and headgear will also be normally the same, i.e. we photograph ourselves with no hat and without glasses (even though they are permitted, whether or not the sight is impaired, you are able to remove the glasses - only then do we minimize the risk of rejecting the composite photo, since the risk is the fact that glare will show on the glasses or even the frame covers our pupils). Photos for passports differ mainly in dimensions. Some countries allow merely a specific photo format, others offer several options. One particualr strictly defined size the photo is really a US passport, which should always have the length of 2 x 2 " (51 x 51 mm). Vietnam, however, expects a 4 x 6 cm photo.

How lengthy do you need to wait for passport?

The federal government from the U . s . States usually processes passport applications between three to six days after you have sent from the application. We advise you to try to get your US passport in low travel seasons, like winter or fall.

However, you will get digital photo for all of us passport on the website very quickly!

How can i get and print my US passport photo?

First of all, ready your printable passport photo template on the website - have a selfie, upload it, and appearance if you want it. If you feel you don’t look great within the photo, simply retake the image!

Next, choose among the options - you will get the passport photo template free of charge, although it won’t possess the background instantly removed, therefore it would need you to stick to the guidelines more precisely. Or save some time to for 4.99$ you'll be able to download an expert US passport photo with acceptance guarantee! For Six.99$ additionally, you will obtain a document delivered at the doorways!

Thirdly, should you made the decision on the digital form of the photo, discover the nearest photo-copying point or pharmacy with photo check printer where one can print it like a 4x6 inch photo (postcard-size photo). On this type of US biometric photo template, you'll find 4 passport photos prepared to be slashed out and posted towards the US passport office!

Lengthy story short - you can aquire a digital US passport photo here and print it at any photo-copying service (like Walmart or Costco). Scroll lower to determine the rules regarding how to have a biometric photo which will meet all of the official needs! (or simply have a photo and our AI compliance check tool will explain what’s wrong)

Will the US passport photo have a similar size as other passport photos?

US passport photo is really a biometric photo, meaning the photo should let the government bodies easy recognition of the passport holder. The majority of the needs are standard biometric photo needs. The important thing distinction between passport photos all over the world consists usually in dimensions and background from the photo. For instance, Canadian passport photo has the length of 50x70mm, Chinese passport photo 33x48 mm and British one 35x45 mm. US passport photo size, being 2x2 in (51x51mm), is fairly uncommon. Make certain your photo follows US passport photo needs and never, for instance, British passport photo needs.

Once we have pointed out above, a biometric photo function would be to let a police officer recognize you like a valid passport holder. That’s why, while going for a biometric photo, you need to follow some guidelines. You'll find them below. Make certain you read them before going for a US passport picture for the documents!

Universal guidelines for any 2x2 US passport photo

  • Stand near to wall to reduce shadows
  • Switch off overhead lighting to get rid of shadows
  • Look straight in the camera.
  • The mind should be neither twisted nor tilted in almost any direction, look straight ahead.
  • Make certain the hair doesn't cover the face area or perhaps the eyebrows.
  • Don't put on jewellery, hat or earphones
  • Observe that your camera lens ought to be placed at eye level
  • It's good to accept picture from the distance of approximately 3 ft.
  • Photo will include shoulders and a few space above mind
  • You'll want an unbiased facial expression.
  • Size of america passport photo needs to be exactly 2x2 inch - But don’t be worried about it - our photo popping tool will crop it accordingly. (Or make a 4x6 inch photo template and print 2 US passport photos)
  • Background needs to be white-colored or off-white-colored so remember to accept photo standing against a white-colored-colored wall (or we are able to correct the backdrop instantly for you personally within $4.99 service)

Faq's

&#128161 Just how much will a passport photo cost?

The price of a passport photo depends in route you receive the photo. Inside a marketplace studio it costs around 20$, Walmart charges 7.44$ and Passport Photo Online (that is greater than a usual photo maker or popping tool) charges you just 4.99$. If you take the passport photo yourself, it will save you not just money, but additionally time.

&#128161 How do i have a passport photo in your own home?

Yes, you'll be able to have a passport photo in your own home as lengthy because it meets all of the needs. The simplest way is by using a photograph popping tool or perhaps a passport photo generator that will identify all of the potential issues having a photo, crop it and frame in complete agreement using the document’s size and needs. Our suggestion is to test Passport Photo Website or its photo popping application on Android.

&#128161 What must i put on inside a passport photo?

Since passport is definitely an official document, we recommend a good-casual style, which can make you appear good and professional. Extravagant outfits or uniforms could potentially cause a photograph rejection. Religious clothing, however, is permitted, so in situation your beliefs need a specific outfit, there shall 't be any difficulty with that matter.

Consider the following blog article to discover what methods do models use to look great within the passport photos.

&#128161 Can One have a passport photo with my phone?

Yes, you are able to have a passport photo together with your phone. All you need to do is upload a selfie to the website and our tool will change it to some professional passport photo. You may also use our photo popping application and have a passport photo together with your phone.

&#128161 Can One take my very own passport photo?

Yes, a passport photo could be taken easily and rapidly on your own and in any place.

The very best and simplest way to consider a photograph is by using passport-photo.online, which is a lot more advanced than any online document photo generator available on the web. Using our website, all you need to do is have a selfie, against any background, and just focus on evenly illuminate the face. The remainder is going to be taken proper care of by passport-photo.online, i.e. it'll plot the face area, obvious the backdrop from shadows along with other images and save the photos within the right format and size. An additional benefit is that you don't need to go anywhere and pay 20 or perhaps 25$ for that photos. This method is particularly helpful for passport photos for young children and babies.

&#128161 Can One put on glasses inside a passport photo?

No, glasses aren't permitted inside a US passport photo - neither prescription glasses nor shades, unless of course you've got a medical reason which forbids you against using the glasses off. In this situation an announcement signed with a physician is needed.

&#128161 Can One put on lipstick inside a passport photo?

Unless of course it covers a distinguishing mark, lipstick is permitted in passport photos, plus another official documents. Our suggestion, however, would be to not use too flashy type of lipstick.

&#128161 What makeup must i put on inside a passport photo?

Makeup for any passport photo is permitted, but it should be subtle and delicate enough to help make the part of the photo recognizable. Women can accentuate their eyes with mascara or crayon as well as their lips with lipstick, they might make use of a gentle foundation. However, we wish to stress that makeup cannot hide or mask the so-known as special figures, i.e. furrows, strong wrinkles, scars or permanent beauty marks. If such characteristics are covered within the photo, the photograph won't satisfy the needs of law and really should be rejected. Whether or not the photo passes the verification process, don't be surprised problems in the airport terminal or border control.

&#128161 Can One smile within the passport photo?

Possess a neutral facial expression with eyes open. All kinds of unusual expressions are forbidden. Don't mix your vision or stick your tongue out. Within the U . s . States an all natural smile is permitted, however, the smile shouldn't show the teeth.

&#128161 Can One put on lenses within my passport photo?

You are able to put on lenses inside your passport photo, as lengthy they do not cover any distinguishing marks. For those who have tinted lenses for medical reasons, you might want to give a signed medical statement.

&#128161 Can One put on earrings within my passport photo?

Yes, you are able to put on earrings or clips in your passport photo. The only real requirement is they shouldn't hamper one’s face recognition. Such earrings that will cover e.g. area of the neck or cheekbones can't be worn within the photo.

&#128161 How you can pose for any passport photo?

Crunches straight, don't hold your mind at any height, look directly in the camera and shoulders lower and back.

If you wish to look great inside your passport photo, make certain you learn all of the methods utilized by models we discussed within our blog article.

&#128161 How big is really a U.S. passport photo?

U.S. passport photo has the length of 2x2 inches (51x51 mm). It's also how big most official documents in the united states, including driver’s licence or Identity Card.

&#128161 What is the passport photo dress code?

Since passport is definitely an official document, consider dressing with this occasion. We advise smart-casual clothing. It'll make you appear good and professional. Extravagant outfits or uniforms could potentially cause a photograph rejection. Religious clothing, however, is permitted, so in situation your beliefs need a specific outfit, there shall 't be any difficulty with that matter.

If you wish to make certain you appear good within the photo, check out this web site article.

&#128161 Can One have a passport photo inside a photo booth?

Yes - the photo drawn in a photograph booth can be used an image connected to the application for any passport, driving licence or identity card, as lengthy because it meets all of the needs. Most photo booths permit the passport photo size to select, so make certain you're considering 2x2 inches dimensions. Photographs drawn in photo booths are less costly and frequently of higher quality than individuals drawn in 'professional' photography studios. That's the reason increasingly more town halls and embassies choose to place photo booths within their structures.

Remember that you could also employ a photograph booth mobile application, which enables you to obtain the same result cheaper and faster.

&#128161 Can you really take photos for any newborn baby's passport?

Every U.S. citizen, together with a baby, may have a passport, but to get one you although, but you need to have a photo of these a baby and just then make an application for the document. Within the situation of the baby, it is advisable to go ahead and take passport photo on your own so as not to reveal the infant to infections and phone with germs, which regrettably occur in some photo taking institutions. You may also take this type of photo together with your cell phone, for instance while using passport-photo.online service or and among the passport photo maker apps.

&#128161 For which other official documents in the united states will i require a passport-style photo?

US passport photo, getting the length of 2x2 inches (51x51 mm) may be the official photo format for the driver’s licence and citizenship application.

&#128161 Do you know the primary US passport photo needs?

The primary US passport photo needs:

  • Neutral facial expression
  • You ought to directly face your camera with full face because
  • Normal clothing. Extravagant outfits or uniforms could potentially cause a photograph rejection. Religious clothing, however, is permitted
  • Background ought to be white-colored or off-white-colored colored
  • Glasses, earphones along with other products shouldn't be worn
  • The length of the photo need to be 2x2 inches (51x51 mm)
  • The passport photo ought to be taken in the last six several weeks

&#128161 Can I've got a beard within my passport photo?


Yes, it's certainly legal to possess a beard inside a passport photo, even though you should keep in mind the passport photo needs to resemble you in the manner it wouldn't constitute any trouble for the border control. Hence, should you drastically improve your look by shaving it, consider renewing the passport photo to prevent any problems.


&#128161 Can One use my iPhone to consider a passport photo?


To become recognized passport photos need to meet several needs like hue of the backdrop or size the photo. Hence, your iPhone camera may not allow you to have a valid passport photo, however, you should use our photo popping tool or perhaps a passport photo maker which will edit your photo for you personally.


&#128161 What's the best passport photo application?


If being best pertains to the cost, consumer experience and quality, we'd recommend you our passport photo maker. For 4.99$ You're going to get an expert passport photo inside a couple of seconds!


&#128161 How do you obtain a digital passport photo?


If you want digital passport photo and don’t need to concern yourself with the printed one, you need to use our passport photo generator. It'll help your selfie right into a digital passport photo inside a couple of seconds. It will likely be downloadable within the most helpful formats.


&#128161 How do you crop a photograph to passport size?


The simplest way to do this is by using a passport photo maker. All you'll have to do is upload a photograph and select “US passport” to crop it correctly. It can be done for 4.99$ here.


&#128161 What's the dimensions of a passport size photo?


The peak of the passport photo is 2 " (equal to 51mm) and it is width is 2 " (equal to 51mm) too. You should check another needs from the passport size photo at our website.


Was these details useful?


Rating: 4.66 - quantity of votes: 64


Similar documents / photos


Official documents in the united states


  • Baby Passport Photo

  • Walgreens Passport Photo

  • AAA Passport Photo

  • Costco Passport Photo

  • CVS Pharmacy Passport Photo

  • FedEx Office Passport Photo

  • iPhone U.S. Passport Photo

  • Rite Aid Passport Photo

  • Target Passport Photo

  • U.S. Citizenship application

  • UPS Passport Photo

  • US Passport Photos Near Me

  • United states postal service (US Postal Service) Passport Photo

  • Walmart Passport Photo


  • Visas along with other documents needed abroad


    • Employment authorization Document

    • Eco-friendly Card

    • Russian visa 35x45 mm (3.5x4.5cm)

    • Thailand visa 35x45 mm (,35x0,45 cm)

    • US Visa 2x2 inch (51x51mm)

    • Visa to Canada 35x45 mm (,35x0,45 cm)

    • Visa to China 33x48 mm (3,thrice 4,8 cm)


    • Universal size photos


      • Photo 2x2 inches (51x51 milimetres)

      • Photo 30x40 milimetres (3x4 cm)

      • Photo 35x45 milimetres (3,5x4,5 cm)

      • Photo 50x50 milimetres (5x5 cm)


      • Online


        • epassportphoto.com

        • oddprints.com

        • persofoto.com

        • US Passport IDPhoto4You.com


        • Mobile application Download a totally free application


          Select a language:


          • Contact

          • Blog

          • Terms & Conditions

          • Online Privacy Policy


          • Official documents in the united states

          • Visas along with other documents needed abroad

          • Universal size photos

          • Other documents

          • Student IDs and College diplomas

          • Online


          FunFotos sp. z o.o.
          ul. Mielczarskiego 8 / 58
          02-798 Warszawa, Polska


          KRS: 0000434676
          REGON: 302228040
          Puppy nip: 7831692257


          5 Simple Photo Editing Tips To Make Your Photos Pop [5 Photo Editing Tips]

          5 Simple Photo Editing Ideas to Help Make Your Photos Pop


          @timbrookes
          August 16, 2020, 6:40am EDT


          The web site good photo along with a great one may be the couple of minutes spent editing it before you decide to share it. They can rapidly boost the caliber of your photos.


          You may make many of these edits on the smartphone using built-in tools, like Apple’s Photos application or Google Photos. You will find, obviously, more in-depth apps readily available for both superior.


          Recover Details From Shadows and Highlights


          Highlights would be the lightest regions of your image, while shadows would be the darkest. If either of those are pure white-colored or pure black, these areas are gone- or underexposed. Fortunately, you can test and claw back some detail from all of these areas while using “Highlights” and “Shadows” sliders.


          The format you accustomed to capture your image will affect just how much detail you are able to recover. Should you shot a picture in RAW on the dslr or mirrorless camera, or you've got a smartphone application that may capture RAW photographs, you’ll have much more to utilize.


          However, if you’re utilizing a compressed image format, like JPEG, a lot of the detail within the highlights and shadows is discarded throughout the compression process. A RAW file is a lot bigger since it maintains all the data taken whenever you press the shutter, including portions which are invisible towards the eye without some editing.


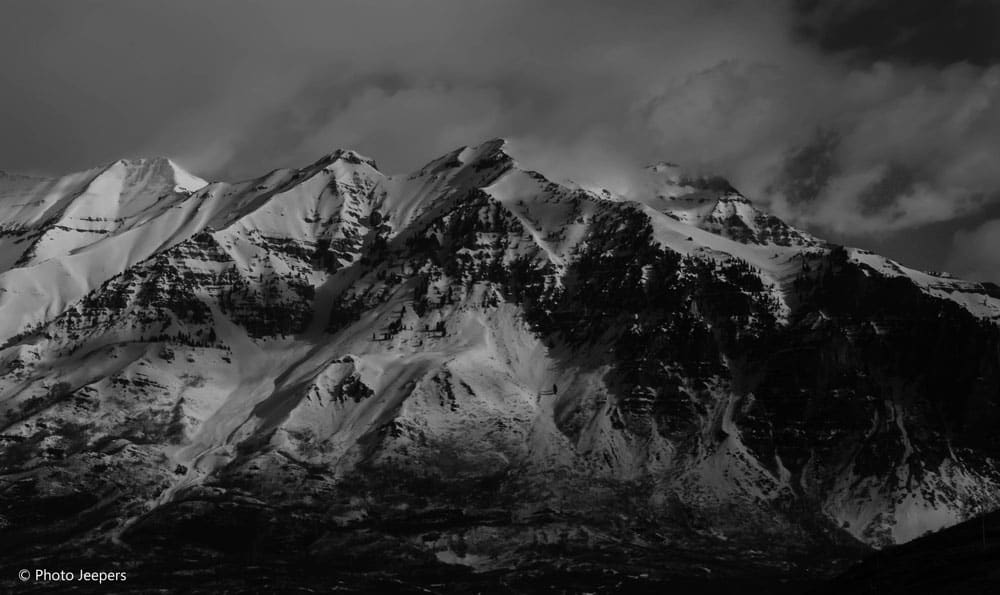
          This unedited image has dark shadows and vibrant highlights. Tim Brookes


          Even when you’re shooting in JPEG on the smartphone, you will be able to recover some detail. The goal here's to produce a “flat” image, by which there aren't any over- or underexposed areas. Using this method, you’ll lose contrast, but that’s okay since you can add it back afterward.


          First, lessen the “Highlights” slider before you see some detail go back to the lightest regions of your image. Then, boost the “Shadows” slider to recuperate some detail within the darkest areas.


          What lengths you decide to go with either of those settings depends upon your image, its format, and also the look you’re attempting to achieve.


          Exactly the same image previously mentioned using the highlights and shadows adjusted to revive detail. Tim Brookes


          You now have the flat image with increased dynamic range. Now you can progressively then add contrast into the image while using contrast slider. Go slow, though—you don’t wish to lose the detail you simply retrieved. The bottom line is to obtain the right balance between your dynamic range and contrast.


          This can be used method to fix over- or underexposed images by focusing mainly around the highlights or shadows, correspondingly.


          Straighten Your Photos (or Find Other Straight Lines)


          Should you don’t already straighten your images, it’s possible you’ve never observed they’re uneven. Regrettably, whenever you do start noticing this, it may rapidly become an obsession. It can save you your sanity by always correcting your images in postproduction before you decide to share them.


          The simplest way to straighten a picture is to discover the horizon. In case your image is of the landscape or features the horizon in almost any prominent way (just like a group portrait taken outdoors), follow the horizon whenever you can.


          Obviously, there’s more to straightening images than merely matching the horizon.


          Not every images feature the horizon. In individuals cases, it’s important to consider other straight lines you should use. For instance, in indoor shots, you may search for beams or support beams. Sometimes, though, you may have a picture with lines that weren’t straight to start with, for example beams within an old building or perhaps a toppled fence publish.


          In such cases, you’ll want to use your very best judgment to choose a leading straight line and follow it. There are numerous factors playing here, including focal length as well as your perspective whenever you required the shot. For instance, a picture of the skyscraper shot upward will probably feature two converging lines that will get closer close to the top.


          You can aquire a much more hands-on by experimenting with perspective distortion tools. These permit you to by hand distort a picture on axes to obtain a perfect result.


          You may also just choose your lines wisely and gone with it!


          Crop Your Images for much better Composition


          Most digital camera models now shoot in the plethora of around 20 megapixels. This is sufficient to print a pristine photo at approximately 18 x one foot at 300 dots per inch. You may also usually print a bigger version at 200 dots per inch or lower. What this means is even when you’re printing images, you've got a large place to have fun with to create crops and increase your composition in publish.


          It’s always more suitable to nail lower the composition before you decide to press the shutter. Thinking two times before you decide to fire a go will definitely enhance your photography. However, photography also involves understanding which changes you may make to enhance your images once you bring them, and popping is really a effective tool.


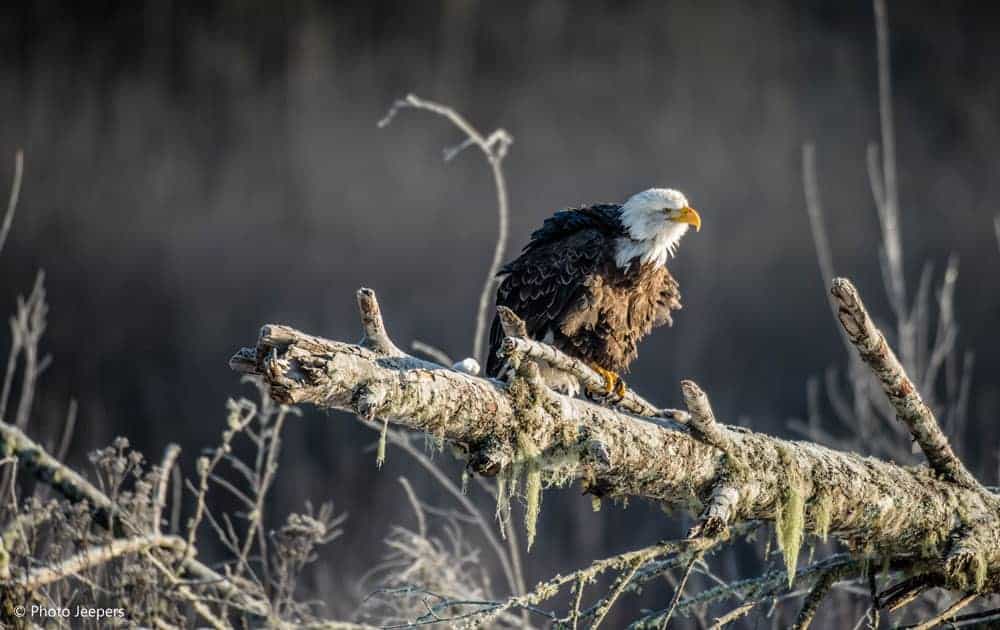
          This unedited image includes a distracting vehicle mirror within the foreground. Tim Brookes


          That which you omit of the photo could be just as essential as that which you leave in. Zooming together with your ft isn’t always possible, and never everybody can transport a 400mm lens within their back pocket. Don’t hesitate to get rid of any distracting factors that draw attention away the topic of your image.


          Popping enables you to definitely remove any distracting elements. Tim Brookes


          Remember, there aren't any strict rules with regards to photography. Experiment until you’re pleased with the outcomes. Your investment rule of thirds, or at best do not rely on it an excessive amount of on your workflow. Focus rather on developing a composition that feels organic, no matter where the grid lines fall.


          Removing any distracting foreground objects or extraneous details round the fringe of a frame will draw the attention toward the topic in the centre. However, it's also wise to resist the need to strongly center your subjects. Most of the time, an off-center portrait is much more visually pleasing than the usual perfectly centered one. For this reason documentary filmmakers frequently position their subjects close to the frame.


          For this reason leading lines—the lines inside your image that naturally lead the attention inside a certain direction—are important when popping.


          Correct White-colored Balance for much better Colors


          Most cameras and smartphones perform a good job of nailing white-colored balance the very first time. Obviously, no system is perfect. It’s simple to use a handbook white-colored balance and end up forgetting to alter it. Sometimes, conditions change rapidly, or competing light sources mess up the white-colored balance.


          Different causes of light create a specific temperature of sunshine, which is reflected within the white-colored balance. A golden sunset casts a hot glow, whereas an overcast shot of the snowy mountain may appear cold and blue. Tubular fluorescent lights cast a chilly white-colored glow, while incandescent lights in lamps are often warmer.


          When the white-colored balance is off, skin color won’t look right, nor will any white-colored or grey areas inside your image. This can be used to your benefit to produce warmer or cooler scenes, but here, we’ll be concentrating on getting as near to neutral white-colored as you possibly can.


          The simplest way to get this done would be to boost the “Vibrance” slider. This will make the dullest colors inside your image stick out. It's also wise to have the ability to tell out of this whether your image is simply too warm or cold.


          Attempt to strike an account balance between cold (blue) and warm (yellow) by modifying the “Temperature” (or “Warmth” in certain editors) slider.


          Once you’ve struck an account balance between yellow and blue, turn your focus on eco-friendly and green (pink). Most image editors in addition have a “Tint” slider will strike the best balance between eco-friendly and green. It’s a great deal simpler to obtain this right using the “Vibrance” elevated.


          When you’ve achieved a great white-colored balance, your image need to look neutral. Whites ought to be white-colored, and skin color, hopefully, is going to be as near to normalcy as you possibly can. It's not easy to obtain skin color right, despite you’ve adjusted, especially if there’s any colored lighting within the scene.


          Just be sure you lessen the “Vibrance” setting to some thing reasonable when you’re done.


          Boost Colors with Vibrance to Preserve Skin Color


          The “Vibrance” slider targets the dullest colors inside your image without overdoing the tones which are already saturated. You should use the “Saturation” slider to improve the general quantity of color, however this affects the whole image.


          It’s super easy to exaggerate color saturation and make up a radioactive mess of the image. Skin color which are too saturated can produce a subject look jaundiced. Blemishes, like freckles or moles, may become far too exaggerated.


          All things in a picture will begin to fight for attention. You should use color to guide the attention, but you need to do so carefully.


          This is when the “Vibrance” setting is available in. It’s such as the “Saturation” slider, however with training tires. It’s particularly great for saving colors in shadows, which are usually dull because of underexposure.


          Don’t Spend Big on Photo Editors


          Again, you are able to perform many of these edits directly on your smartphone in the simplest of photo editors, such as the built-in tools on Android or iPhone


          While Adobe Illustrator remains the undisputed desktop photo-editing king, there are many alternatives you should use that don’t need a fee every month.


          Best Photo Retouching Software The Complete List (Updated) In 2020 [Best Of Photo Retouching]

          Best Photo Retouching Software: The Entire List in 2020 The best idea photo retouching software in 2020? Retouching a photograph is importan...